

Orscheln Smart Safe
OR50145240 - 30 Gun
OR50145360 - 44 Gun
OR50145480 - 56 Gun
OWNER’S MANUAL AND OPERATION INSTRUCTIONS
CAUTION: Read all instructions and safety tips before using this product.
Tables of Contents
Setting Up Your Safe
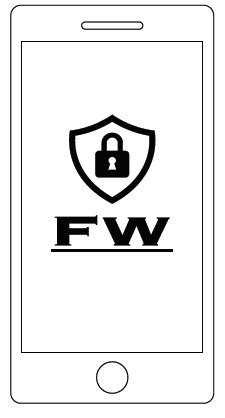
| Smart Phone | OR | Touch Pad |
|
Quick and Easy Setup with More Functionality |
Less Functionality than using your phone (See page 7) (ATTN: ONLY PROCEED WITH THE FOLLOWING STEPS IF YOU DO NOT INTEND TO USE YOUR SMART PHONE AND THE FIRST WATCH GUARDIAN APP TO ACCESS YOUR SAFE. IF YOU LATER DECIDE TO USE THE FIRST WATCH APP YOU MUST RESET THE SAFE’S LOCK) |

Safety Precautions
1. Never leave a loaded firearm in this safe. Some types of weapons may discharge easily, and even though this safe is all steel construction, a bullet may penetrate the steel wall.
2. Check and remove firearms contained in this safe before returning it to First Watch or a Retail store. If the safe will not open, a certified locksmith may be able to open this product safely.
3. Always leave safe locked while on display in stores.
4. Not intended for use by children. Do not play on, in or around the safe.
5. This is a heavy unit, lifting may require a fork lift. Trying to lift this product without the use of heavy lifting equipment may result in serious injury or death.
6. If you misplace your Skeleton Key or need to purchase a replacement, contact Homak with the information on the back of this manual.
7. This safe will not protect electronics in case of fire. Temperatures can reach up to 350° F (177° C), which will ruin items such as CDs, DVDs, Cameras, USB drives, etc.
8. Do not lock override keys and manual inside safe. You will want to keep these materials in a separate, secure location.
Understanding Your Safe
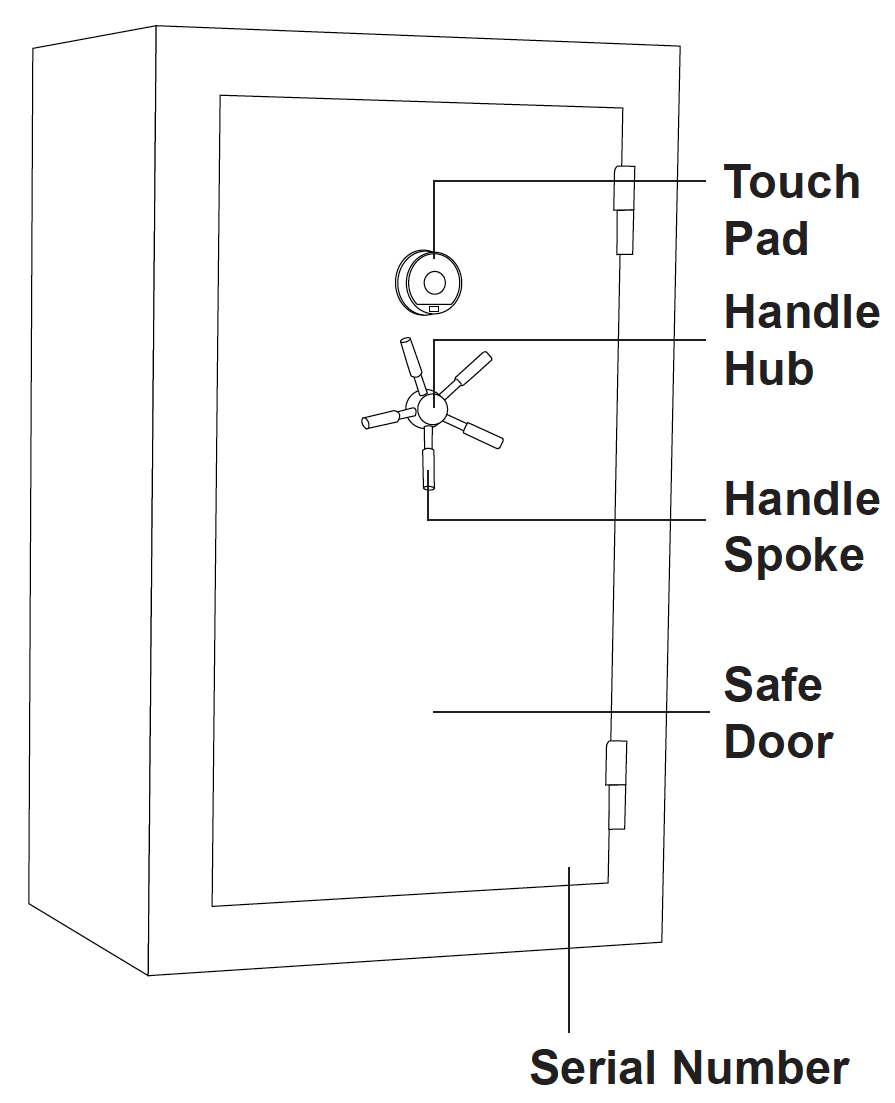
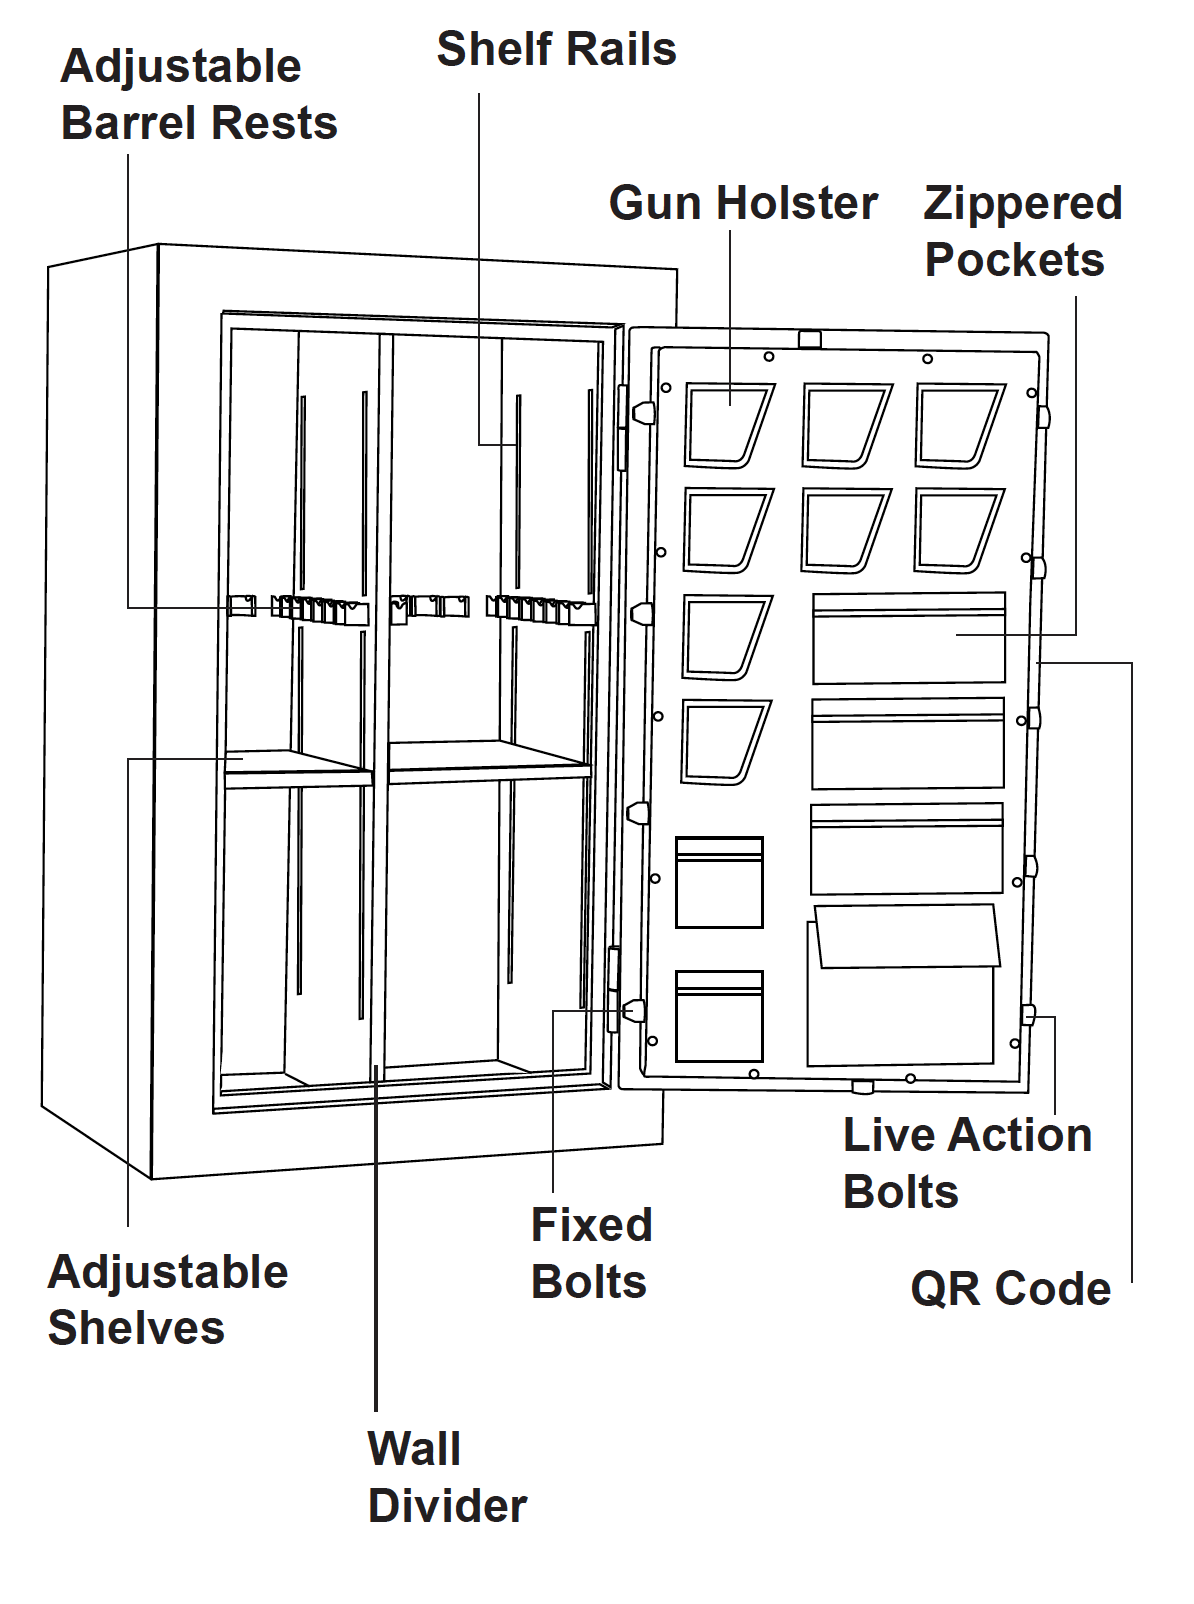
Reference Image. Actual Model and design may vary
ACCESSORIES INCLUDED
1. Hardware Bag contains the following:
2 Lag Screws and Washers, 2 Plastic Anchors, Shelf Support Clips
2. Removable Shelves
3. 2 Skeleton Keys
4. 4 AA Batteries
5. E Key
*Note: Additional accessories can be purchased by calling customer service at 1-800-874-6625
PLEASE NOTE:
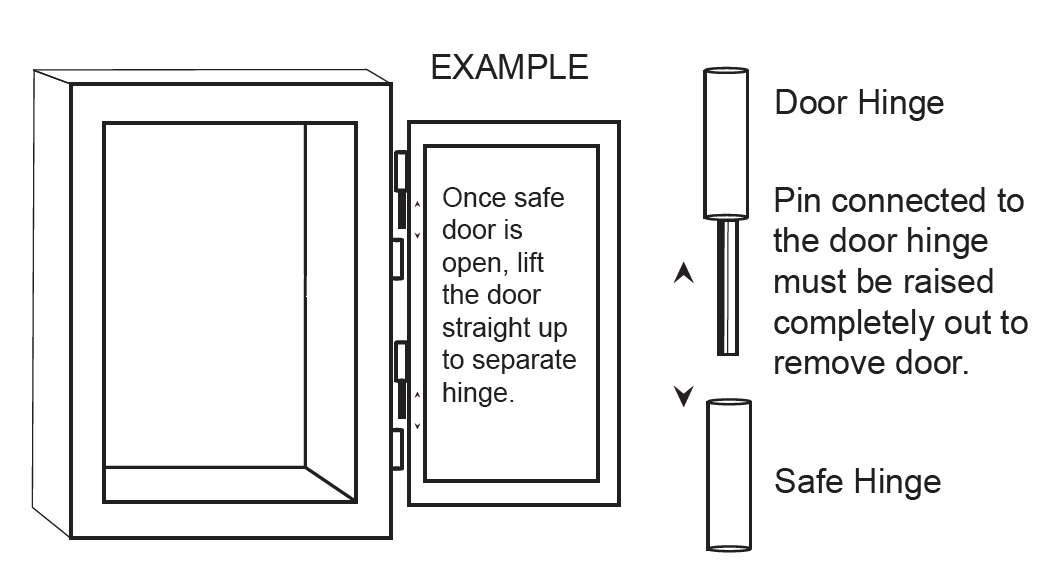
Door can be removed to reduce weight when relocating safe.
 |
 |
|
Press up on tab and twist entire keypad to remove, and access the battery pack. Be sure to insert the batteries in the proper orientation and order, and always use new and brand name batteries. |
Remove Key Pad and insert key into keyhole to use override key |
Setting up your Safe Using the Keypad

If you are going to be using your phone and the First Watch Guardian app, please advance to page 7. (ATTN: ONLY PROCEED WITH THE FOLLOWING STEPS IF YOU DO NOT INTEND TO USE YOUR SMART PHONE AND THE FIRST WATCH GUARDIAN APP TO ACCESS YOUR SAFE. IF YOU LATER DECIDE TO USE THE FIRST WATCH APP YOU MUST RESET THE SAFE’S LOCK)
Factory Preset Code |
|
All Orcheln Outdoors Smart Safes (by First Watch) come with the same 8 digit Factory Preset Code: 1 2 3 4 5 6 7 8. This Code will only be used to set up your Master Code. |
Master Code |
|
The Master Code is an 8 Digit Code created by the 1st user, used to set up user codes and perform the functions of the safe, detailed in this manual. To set the Master Code, follow these steps:
This is now the master code. NOTE: Master Code CANNOT be used to unlock the safe. |
User Code |
|
A 4 digit Code. User Codes will have 24/7 access. Temporary user codes have to be created using mobile app and are number of uses and/or time bound. To add a new user code, follow these steps:
*N = a number 1-49. Up to 49 users codes can be set NOTE: BEFORE YOU CLOSE YOUR SAFE’S DOOR, BE SURE TO TEST YOUR USER CODE TO MAKE SURE IT HAS BEEN ENTERED PROPERLY, AND THAT THE DOOR CAN BE UNLOCKED SUCCESSFULLY.
|
Delete User Code |
|
*N = a number 1-49. Up to 49 users codes can be set
If you forget the number (1-49) assigned to a user, you can use the user code to delete it as well |
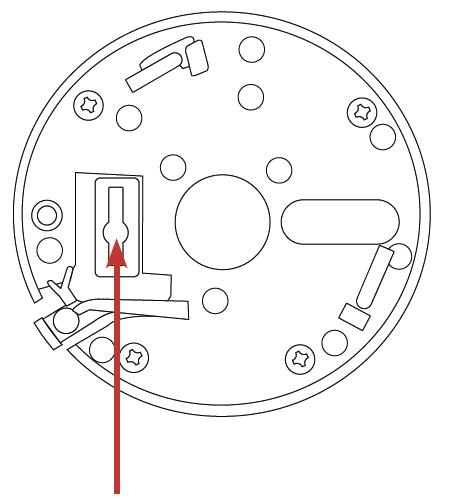
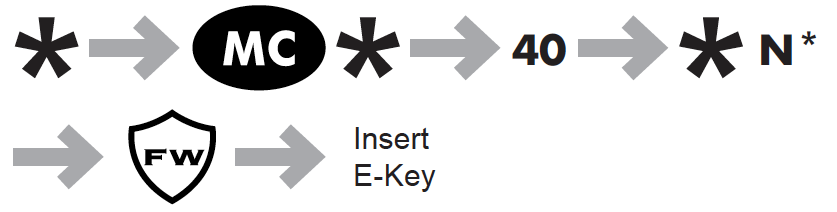
Add E-Key(Limited to 49) |
|
|
|
*N = a number 1-49. Up to 49 E-Keys can be set Only Supports First Watch E-Keys |
Delete E-Key |
|
*N = 0 to delete all E-Keys, or N= 1-49 |
Hidden Code |
|
8 digit random numeric code tied with serial # used to reactivate factory preset code. (To retrieve this hidden code, contact HMC to verify ownership (24 hour waiting period) This will reset everything including removing all mobile users, user codes, PIN, BLE FOBs & E-keys) To use Hidden Code:
|
| Open Safe: |
|
To Open your Safe:
|


Touch Pad
Floor Mounting Instructions
ATTENTION: This method is best performed using several people. Homak is not liable for any accidents, injuries, or damages that may occur.
1. With Safe open, remove Floor Carpet and Plastic Caps to expose bolt heads.
2. Using a socket wrench set, carefully remove bolts that secure metal legs to safe - On ONE side, only.
3. Carefully push safe upwards from the side you just removed bolts from. Use two or more people.
4. Remove the leg from under the safe and GENTLY lower safe to the ground.
5. Carefully remove bolts from the remaining metal leg, then repeat steps 3 & 4.
6. Position safe on the floor where you want it to be mounted, and mark off where the holes need to be drilled.
7. Using appropriate bit, carefully pre-drill holes.
8. Use provided hardware to secure safe to the floor.
9. Replace plastic caps and floor carpet.
Fire Resistant Panel
RE-INSTALLING THE FIRE RESISTANT PANEL:
The fire-resistant panel can be re-installed by placing it back onto the safe’s door framing and re-tightening all screws. (Be sure to carefully line up all holes, and do not fully tighten until all screws are in place.)
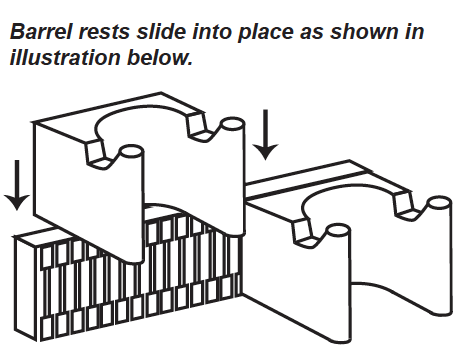
Shelf InstallationWhen installing the shelves, first locate the small plastic bag containing the shelf clips. Push each clip into place, flat side up first, then pinch bottom side into the guide strips on the side walls inside the safe. Make sure to count down the number of holes in the guide strip so that each shelf is level and properly supported. |
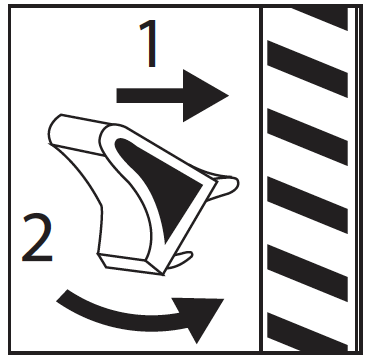 |
Plastic Barrel Rest InstallationThe safe also comes with plastic barrel rests and mounting bars. The mounting bars are fixed, but the barrel rests can be easily removed or rearranged. |
 |
Locksmith Instructions
FOR GUN SAFES
ACCESSING THE LOCKING MECHANISM:
The locking mechanism can be accessed by removing the fire-resistant panel located on the inside of the safe door. It is highly recommended that this be done by a locksmith or trained technician to avoid serious injury or damage to safe door or locking mechanism.
NOTE: Removing the fire-resistant panel from the safe door may require help from a second person. The fire-resistant panel is heavy and could cause serious injury or death.
While the safe door is open, remove all screws from the panel. This step may require the help of a second person. Once the fire-resistant panel is removed from the safe door, store it in a safe place so it does not get damaged. Now the locking mechanism will become assessable to a locksmith.
FCC Info
|
Regulatory Information - FCC Statement Contains FCC ID: 2AP9FFWC301 Contains FCC ID: 2ALPH-E70 |
 |
This device complies with Part 15 of the FCC Rules.
Operation is subject to the following two conditions:
1. This device may not cause harmful interference, and
2. This device must accept any interference received, including interference that may cause undesirable operation.
Any changes or modifications not expressly approved by HMC Holdings could void the user’s authority to operate the equipment.
NOTE: This equipment has been tested and found to comply with the limits for a Class B digital device, pursuant to residential installation. This equipment generates, uses and can radiate radio frequency energy and, if not installed and used in accordance with the instructions may cause harmful interference to radio communications. However, there is no guarantee that interference will not occur in a particular installation. If this equipment does cause harmful interference to radio or television reception, which can be determined by turning the equipment off and on, the user is encouraged to try to correct the interference by one or more of the following measures:
- Reorient or relocate the receiving antenna
- Increase the separation between the equipment and receiver
- Connect the equipment into an outlet on a circuit different from that to which the receiver is connected.
- Consult the dealer or an experienced radio/TV technician for help
Reference Guide
| Open (unlock) | # + User Code(4 digits) |
| Set/Change Master Code | *Factory Preset Code*10*Master Code# | Once Master Code is set, Factory preset code is not active |
| Add a user code (limit up to 49) | *Master Code*20*n*(4 digit user code)# | n = a number 1-49. This will be the user number. You cannot add a schedule when adding a user code with the keypad |
| Delete User Code | *Master Code*30*n# | n=0 (to delete all) or n=1 - 49 to delete individual user |
| Delete user code using actual user code | *Master Code*31*(4 digit user code)# | If you forget what number (1 - 49) was assigned to a user, you can use their user code to delete it as well |
| Add E-Key (limit up to 49) (Only Supports First Watch E-Keys, Sold Separately) | *Master Code*40*n # and now insert E-Key | n= 1 - 49 |
| Delete E-Key | *Master Code*41*n# | n=0 (to delete all) or n=1 - 49 |
| Add BLE FOB (limit up to 49) (Only Supports First Watch E-Keys, Sold Separately) | *Master Code*50*n*1# and now Press & hold key on fob | n= 1 - 49 |
| Delete BLE Fob | *Master Code*51*n# | n=0 (to delete all) or n=1 - 49, n = fob # |
| Reset alarm | #(user code) | For example, when vibration is detected you can reset the alarm by using the Reset Alarm code |
| Keypad sound on/off | *Master Code*70*n# | n = 0(off), 1(on) - default on |
| Vacation mode | *Master Code*71*n# | n = 0(disabled), 1(enabled) - default disabled. When this mode is enabled, all local & remote operations are disabled using the mobile app |
| Keypad | *Master Code*72*n# | n = 0(disabled), 1 (enabled) - default enabled. When the Keypad is disabled, only Keypad enabled commands will be processed and all others will be ignored |
| Vibration sensor on/off | *Master Code*73*n# | n = 0(off), 1(on) - default off |
| Spy Protection | *Master Code*77*n# | n = 0(disabled), 1(enabled) - default disabled |
| Operation | Red LED | Green LED | Blue LED | Orange LED | Beep/Buzz | Comment |
|---|---|---|---|---|---|---|
| Press keypad button (0-9) | - | 0.1 seconds | 5 seconds | 0.1 seconds | ||
| Press keypad button (0-9) (Critical low battery) | - | - | 5 seconds | 0.1 seconds | 0.1 seconds | |
| Correct pin code | - | 1 second | 0.4 seconds | |||
| Incorrect pin code | (.01 seconds) x 3 | - | (.01 seconds) x 3 | |||
| Device is not calibrated | - | - | 0.1 seconds | .01 seconds | After operation , Orange LED will blink | |
| Incorrect pin code entered 4 times consecutively/Device Hack | (0.5 seconds) x 20 | - | (0.5 seconds) x 20 | Red LED + Beep (0.5 seconds) x 20 followed by; Red LED and Buzzer (0.5 seconds) every 2 seconds (total time 60 Seconds) | ||
| Lock and unlock complete | - | 1 second | 0.4 seconds | |||
| Latch jam (Lock/Unlock/Calibration Incomplete) | (0.2 seconds) x 3 | - | (0.2 seconds) x 3 | Blinks 3 times (ON time 0.2 seconds and OFF time 0.2 seconds) | ||
| Enter programming mode | - | (0.2 seconds) x 2 | 5 seconds | 10 seconds | (0.2 seconds) x 2 | When in programming mode: Solid Red, upon Leave programming mode: Red LED off + Beep (0.4 seconds) |
| In programming mode (Correct operation: ) | - | 1 second | 0.4 seconds | Red + Beep (0.5 seconds)*20 followed by; Red LED and Buzzer(0.5 seconds) every 2 seconds (total hack time 60 Seconds) | ||
| In programming mode (Error:) | (0.1 seconds) x 3 | - | (0.1 seconds) x 3 | All LEDs will light up one by one and the buzzer will play with each LED | ||
| Low battery alert (After each operation under low power mode) | - | - | (0.1 seconds) x 5 | (0.1 seconds) x 5 | ||
| Low battery alert (When standby mode) | - | - | ||||
| Critical low battery(When press lock) | 3 seconds | - | (1 seconds) x 3 | |||
| Critical low battery(When unlocked) | 3 seconds | - | (1 seconds) x 3 | |||
| Critical low battery(When standby) | (0.1 seconds) every 5 seconds | - | ||||
| Vibration event detection | (0.5 seconds) x 20 | - | (0.5 seconds) x 20 | |||
| Power ON | 0.5 seconds | 0.5 seconds | 0.5 seconds | 0.5 seconds | (0.5 seconds) x 4 | |
| BLE Connection | - | - | (0.1 seconds) every 5 seconds | Total indication time is 20 seconds | ||
| Reset to factory settings | - | 1 second | 3 seconds | Buzzer Steady 3 seconds, then Green Steady 1 second | ||
| Button press wake up | - | 5 seconds | For touch wake-up time | |||
| Already Lock/Unlock | (0.2 seconds) x 3 | - | (0.2 seconds) x 3 | Blinks 3 times (ON time 0.2 sec and OFF time 0.8 seconds) | ||
| User code already added/ Duplication | 0.6 seconds | 0.6 seconds | 0.6 seconds | (0.2 seconds) x 3 | ||
| General error | (0.2 seconds) x 2 | - | (0.2 seconds) x 2 |

PLEASE KEEP IN A SAFE AND SECURE PLACE AWAY FROM CHILDREN
PRODUCT REGISTRATION
Thank you for purchasing this product. Please take the time to register your product by calling
1-800-874-6625 or by visiting www.homak.com and clicking the “Product Registration” link.
This will allow us to better assist you in the future for:
-Combination Code Retrieval -Parts
-Warranty Claims -Other Product Concerns
The following parameters are stored into the boards memory:
Serial Number: 16 Character Number
Security Token: 10 Character Security Token
Hidden Code: 8 digit random numeric code
Manufacturer: HMC Holdings
Comments
0 comments
Please sign in to leave a comment.